One of the first circuits I ever build on a breadboard was the ubiquitous astable multivibrator. Two NPN transistors, two capacitors, two LEDs and four resistors. It’s a circuit that just about every electronics engineering student and hobbyist builds at some point in their life. Sure, a 555 in astable mode uses fewer components, and is much more flexible, but unless you know what happens inside that little 8 pin black box it may as well be magic. The classic astable multivibrator has no tricks hidden away – it’s all there for you to poke at and and analyse.
How It Works
The circuit takes advantage of the imperfections inherent in all electronic components. Every component of a given type is slightly different due to factors such as the manufacturing process and the raw material used. This can be undesirable in some situations, but it is essential in the case of the astable multivibrator.
When power is first applied current flows to the bases of both transistors through R2 and R3, charging C1 and C2. As soon as one of the capacitors reaches the base emitter saturation voltage of the connected transistor (around 0.6v depending on the transistor used) it will go into saturation and turn on.
Let’s assume that it is Q1 that goes into saturation. It will turn on and allow current to flow through it, turning on LED D1. While this is on, capacitor C2 starts charging up through resistor R4 and LED D1. Meanwhile, C1 will begin to charge through R2.
As soon as the voltage across C1 reaches the base-emitter saturation voltage of Q2 (again, around 0.6v) it turns on Q2, lighting up LED D2 and causing capacitor C2 to discharge nearly instantly. This causes the voltage on the opposite side of C2 to drop considerably, bringing the base of Q1 below 0.6v and turning it off.
Now capacitor C2 starts charging up via R3 and C1 starts charging up to 5v. Once the voltage across C2 reaches the emitter-base saturation voltage it turns Q1 back on, discharging C2 and turning Q2 off.
The whole cycle repeats as long as the circuit is powered.
Choosing Component Values
The oscillation frequency is determined by the values of resistors R2 and R3, as well as capacitors C1 and C2. The total period of oscillation (T) can be determined by adding together the periods of time that each transistor is switched on. These values (t1 and t2) can be calculated using the following formulas:
T = t1 +t2
t1=0.693 x C1 x R2
t2=0.693 x C2 x R3
All time values are in seconds, all resistor values are in ohms, all capacitance values are in farads.
0.693 is derived from the RC time constant, or τ. At 0.693 of one time constant the capacitor is at 1/2 of its maximum charge.
Finding the frequency (ƒ) of oscillation is a simple case of finding the inverse of T.
ƒ = 1/T
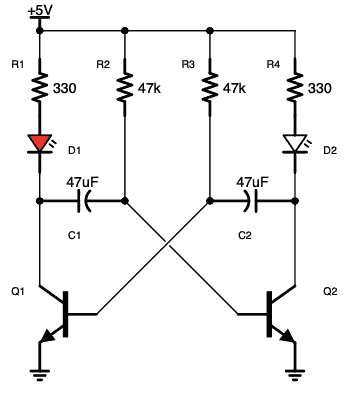
Using the schematic above, where C1 and C2 are 47 μF, and R2 and R3 are 47 kΩ, we can calculate the frequency with the following equations:
t1=0.693 x 0.000047 x 47000 = 1.530837
t2=0.693 x 0.000047 x 47000 = 1.530837
T = 1.530837 + 1.530837 = 3.061674
ƒ = 1/3.061674 = 0.326618706 Hz
Resistors R1 and R4 should be of a lower value than resistors R2 and R3. When the circuit is being used to flash LEDs then a value should be chosen based on the forward voltage and operating current of the LED. If not using LEDs in the circuit then keep the resistor values of R1 and R4 lower than R2 and R3. If you choose values that are too high the circuit will not oscillate.
See the table below for a pre-calculated table of frequencies and component values.
What can I use it for?
| Capacitor Values | 1 nF | 10 nF | 100 nF | 1 μF | 10 μF |
|---|---|---|---|---|---|
| Resistor Values | |||||
| 1 kΩ | 724.638 kHz | 72.464 kHz | 7.246 kHz | 724.638 Hz | 72.464 Hz |
| 2.2 kΩ | 329.381 kHz | 32.938 kHz | 3.293 kHz | 329.381 Hz | 32.938 Hz |
| 4.7 kΩ | 154.178 kHz | 15.418 kHz | 1.542 kHz | 154.178 Hz | 15.418 Hz |
| 10 kΩ | 72.464 kHz | 7.246 kHz | 724.638 Hz | 72.464 Hz | 7.246 Hz |
| 22 kΩ | 32.938 kHz | 3.294 kHz | 329.381 Hz | 32.938 Hz | 3.294 Hz |
| 47 kΩ | 15.418 kHz | 1.542 kHz | 154.178 Hz | 15.418 Hz | 1.542 Hz |
| 100 kΩ | 7.246 kHz | 724.638 Hz | 72.464 Hz | 7.246 Hz | 0.7246 Hz |
| 220 kΩ | 3.294 kHz | 329.381 Hz | 32.938 Hz | 3.294 Hz | 0.329 Hz |
| 470 kΩ | 1.542 kHz | 154.178 Hz | 15.418 Hz | 1.542 Hz | 0.154 Hz |
| 1 MΩ | 724.638 Hz | 72.464 Hz | 7.246 Hz | 0.7246 Hz | 0.0725 Hz |
The most basic use of this circuit is to blink one or two LEDs. I built one up on stripboard when I was quite young and used it to flash two LEDs back and forth on my model railway level crossing.
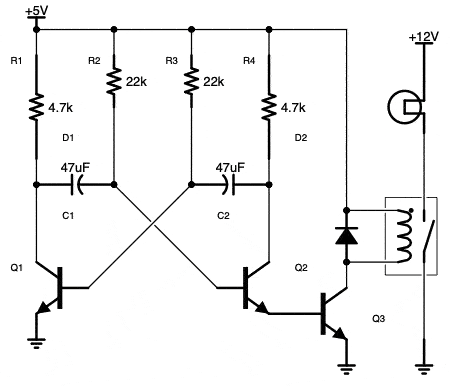
Another use would be to connect the emitter of one of the transistors to the bass of another transistor. This allows the circuit to switch higher current loads, such as a relay.
It is also useful as a basic tone generator. To do this, connect a speaker instead of a relay to the configuration and swap the capacitors for two 47nf capacitors. This will output a tone that is roughly 700 Hz.
More to come…
I encourage you to build up the circuit on a breadboard and see what you can come up with. In my next post I will be showing a project I have built using the astable multivibrator at its core.
Leave a Reply