This post was updated on the 2023-05-02 to include a new method of creating SpecDrum TZX files.
Matt
Back in the 1980s in the UK the Sinclair ZX Spectrum reigned supreme as the king of the home micros. Sure, it didn’t have all of the bells and whistles that other micros of the time had, but it was cheap, and required nothing more than a portable TV and a cheap cassette deck to unlock hours and hours of fun.
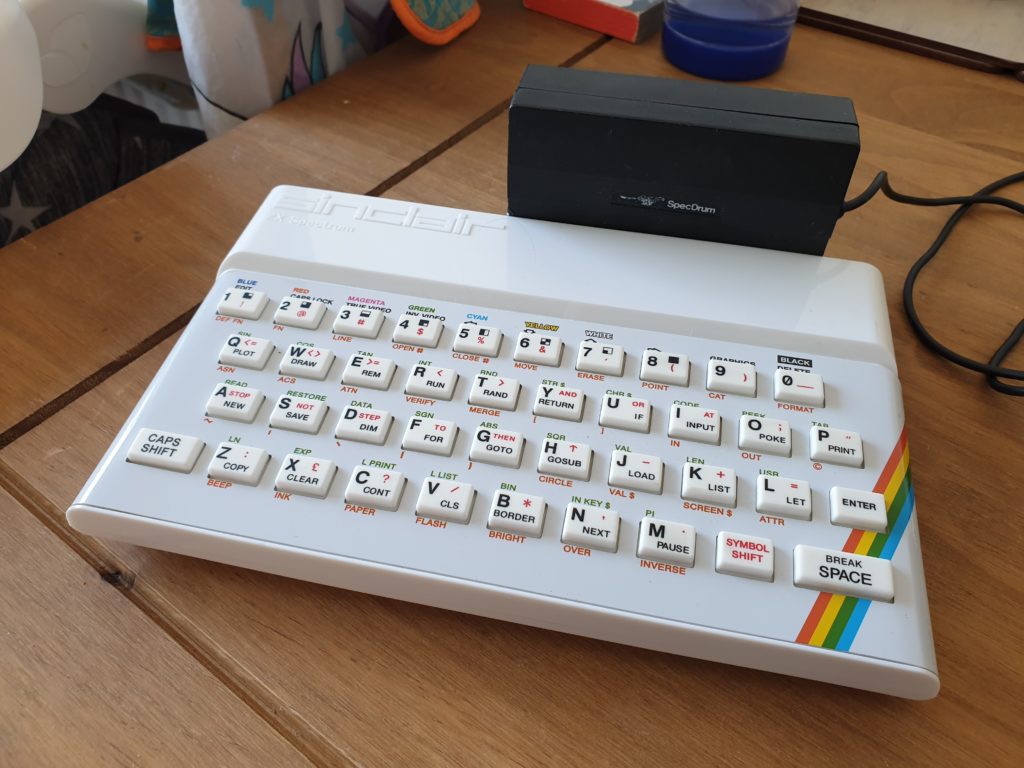
It didn’t take long for folks to see the potential in the machine, and before long they were making it do weirder and weirder things. One of my favourite devices to stick on the back of my Speccy is the Cheetah SpecDrum – a little box that turns the computer into a drum sequencer. Released in 1985, the SpecDrum cost a mere £29.95 (£89.29 in 2018 money) compared to the cost of a full blown drum machine which could cost 10 times that.
Originally the kit came with a pretty bland sounding set of samples; the sort of thing you’d expect from a LinnDrum or similar. Cheetah then released 3 further cassettes with Afro, Latin and Electo sounds. There was a rudimentary kit editor included in these add-ons, but it only allowed swapping sounds from the same slot, and had no function to add custom sounds.
I bought my SpecDrum years ago, and played with it for about a week before putting it away and forgetting about it. The problem wasn’t the clunky interface or the lo-fi sound quality – it was that the included sounds were all quite dull and dated. Unless you really want to make music that sounds like lost Human League demos then you’re a bit stuffed.
I decided to find a way to solve this problem. It’s quite long-winded and there are a few steps required, but this blog describes how I managed to do what I suspect nobody has done before – loaded their own sample data into the SpecDrum software.
Peeking in the memory
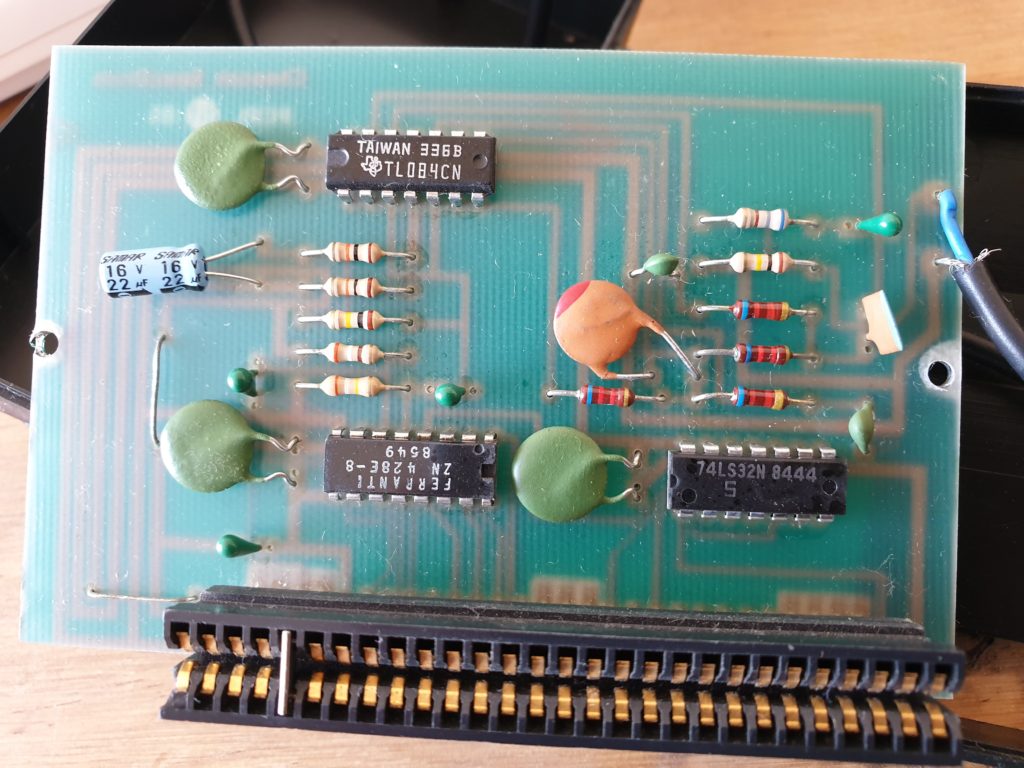
My first job was to find out how the thing was storing its samples in memory, and where. Using the FUSE emulator, which very handily emulates the SpecDrum hardware, I loaded up the software and used the memory explorer to look for clues. There was nothing obvious, so I used the debugger to look at the Z80 machine code as it was running. The software doesn’t directly read from memory to the SpecDrum’s DAC – instead it sums each of the active voices, converts them from a signed number to an unsigned one and then spits it out of port 0xDF. I decided to dump the RAM and load the raw data into Audacity, which handily allows the import of raw data. Bringing it in as 8 bit signed samples I was able to actually play the drum samples in Audacity. I tried a few sample rates, but eventually 20 kHz sounded the closest to the output of the SpecDrum. I’ve since learned that the SpecDrum software sends an OUT instruction every 173 T states, which works out at 20.231 kHz – thanks to djnzx48 over at the spectrumcomputing.co.uk forums for that brilliant piece of info.
How the samples are stored
The way the samples are stored is slightly strange. The first oddity is that the drums are stored out of order, but only just. Sample 2 through 8 are in order, and then sample 1 is tacked onto the end. The second oddity is that while the samples are of a fixed length, some samples are 3072 bytes, whereas others are 2048. There doesn’t seem to be any means of adjusting these sample lengths either, as the tapes that contain the additional kits have only contain the sample names and the raw sample data. Sample data starts at 0x8400 (33792 in decimal) and the block is 21504 bytes long.
The SpecDrum software groups the drum channels into three groups. It can play one sound from each group at a time, but not more than one from each group. This poses some limitations on what you can do with the SpecDrum, but the official kits are laid out in such a way that it’s not much of an issue. For example, Open hat and closed hat are in he same group, and you’re not likely to want to use both of those sounds at the same time.
The table below shows how each of the base kit is stored in memory, and which group each drum is part of. I’ve used decimal to show the memory addresses as this is most useful when putting sample data together in Audacity.
| Drum No | Group | Mem. Offset (Dec) | Length | Standard Kit |
|---|---|---|---|---|
| 1 | 1 | 19456 | 2048 | Kick |
| 2 | 2 | 0 | 3072 | Snare |
| 3 | 2 | 3072 | 3072 | Mid Tom |
| 4 | 2 | 6144 | 3072 | Lo Tom |
| 5 | 3 | 9216 | 2048 | Cowbell |
| 6 | 3 | 11264 | 2048 | Hihat C |
| 7 | 3 | 13312 | 3072 | Hihat O |
| 8 | 3 | 16384 | 3072 | Claps |
Preparing samples in Audacity
Let me be up front about this – Audacity is a pretty terrible audio editor. The interface is awful and it’s not very flexible. One very strong advantage it has though is that it import and export raw PCM samples without the header portion. The other advantage is that you can set the sample rate to any arbitrary value.
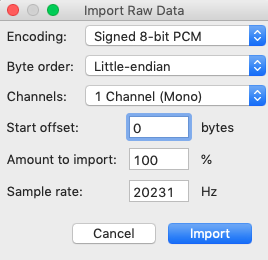
Importing raw sample data is very simple. From the File menu choose Import and then Raw Data. This is useful if you want to grab a copy of any samples from the existing sample tapes. The settings you need are pictured here. Signed 8-bit PCM, Little-endian, Mono and a sample rate of 20231 Hz. This isn’t super important so long as the project sample rate matches the rate you import at, but setting it to 20231 means that what you hear coming out of Audacity should match what you will here coming out of the SpecDrum.
If you’re starting a project from scratch you need to do a few things before you import your own samples. First of all, at the bottom of the window set the project sample rate to 20231 Hz and right click the three position counters and set them to “samples”. This helps when lining up your imported samples.

The next step is importing audio. You can do this by using the Import Audio tool in the File menu. Most samples will either be 44.1 kHz or 48 kHz, and may be in stereo. In order to use them with the SpecDrum you need to either discard one channel or mix the sample down to mono, and then resample the audio to 20231 Hz. Audacity has the functions to do these for you in the Tracks menu.
Once the audio has been resampled it can be trimmed to the right size. I do recommend sticking to the groupings laid out above if assembling a drum kit, as it makes the most sense from a polyphony point of view.
The way I assembled the Toybox kit is I imported each sample onto their own separate tracks and edited them down to size. For some samples a fade-out was required. Then I copied each one to a “master” track, making sure that the sample boundaries lined up with the memory offsets detailed above. The final track should be 21504 samples long.
When exporting the audio it is a good idea to knock the gain down a bit. The SpecDrum uses a relatively simple means of summing the samples together. Rather than clipping the output “wraps around” and can make unpleasant clicking noises. I also added a slight -6db roll off at 7kHz to kill off any high frequency noise that might cause aliasing.
Export the audio using “Other uncompressed files” as the file type, RAW (header-less) as the header type and “Signed 8-bit PCM as the encoding.
Getting the samples back in
The first way I got my own samples into the SpecDrum software was to use the “Import Binary Data” feature in FUSE. This reads the contents of a file and puts them into the memory of the emulated Spectrum. Provided the samples you created were of the right format and length you should just be able to import the file from Audacity to memory address 33792. The drums won’t have custom labels or anything like that, but if all you’re interested in is proving the concept then congratulations – job done. This was the way I first managed.
The real goal was to be able to use the kit load feature of the SpecDrum software – as this would let me load in my own kits on my real Speccy.
Since writing this post I have worked out a new way of producing the TZX files. The tool ZX-Blockeditor is no longer available or maintained (though I have provided a link to an archived copy of the site care of the Wayback Machine). I have left my original method below, but I have also written up a new method that uses software I wrote.
Attempt 1 – The old way
The way I did this was to look at the Afro Kit tape and try to understand how the data was stored. To do this I opened a TZX tape image of the Afro Kit tape in a tool called ZX-Blockeditor (site no longer exists, so I’m linking to the Internet Archive wayback machine) to view the structure of the tape. The TZX consists of two blocks; a header with some text in it and the raw sample data stored as unsigned 8-bit samples. The header file contains the names of the drums as they appear in the software. The file must begin with a lowercase c, and then each drum must have a seven character label. Any spare characters must be padded with spaces. Strangely, unlike the sample data stored in memory, these labels are in the correct order as they appear in the software.
Below are the header portions of the Afro Kit tape and my Toybox tape.
c TRUNK  BUASH HICONGALOCONGA CLAVE COCONUT GUIRO WHISTLE
cKICK   SNARE  HIPEW  LOPEW  HI BEEPCL HIHTO HIHT LO BEEP
Prepare the header in your text editor of choice and save it as a .bin file.
In ZX-Blockeditor create a new file and under Edit choose “Compose Data Block”. Then choose “Custom Data” from the pull down menu and then use the little folder icon to import your prepared header file.
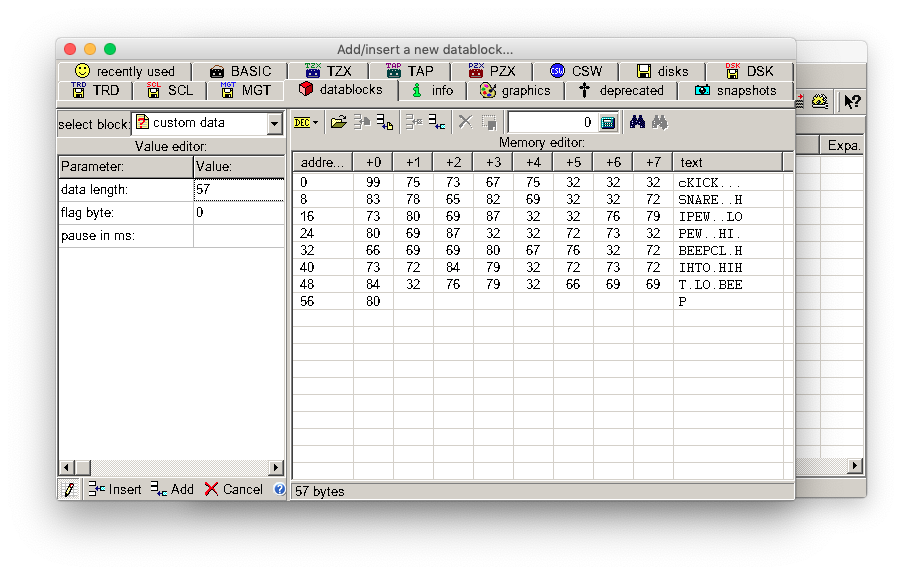
Repeat the steps above for the raw sound date, but this time use standard data instead of custom data.
Save the TZX and you’re done. Congratulations – you just created a drum kit for the SpecDrum!
Attempt 2 – The new way
Since ZX-Blockeditor is no longer being maintained I decided to write a program to create SpecDrum TZX files myself. I have documented how TZX files can be constructed here, and developed that idea into a command line application that makes the process easier.
The first change to the process is that the drum names can be stored in a standard text file with no need to worry about formatting or padding spaces. Each drum name must be on a separate line. Padding spaces are added automatically if the name is too short. Leading spaces and invalid characters are removed, and overly long drum names are truncated. If a drum name is blank, or if all characters are special and have to be removed then the drum is given the line number as its name. If the file does not have at least 8 lines the program will raise an error and close.
Kick          ->    'KICK   '
Snare         ->    'SNARE  '
Open Hihat    ->    'OPEN HI'
Closed Hihat  ->    'CLOSED '
$haker        ->    'HAKER  '
 CLAVE        ->    'CLAVE  '
              ->    '7      '
*$%"          ->    '8      '
Gong          ->    <Ignored>
The audio block is checked for clipping when it is imported, which will prevent clicks and pops if two drums that are too loud are played together.
The new utility, tzx-builder can be downloaded here, and the python source code is available here should you want to run the application on Linux or macOS. Note that if you run the Python script you will need to use the below command from the tzx-builder directory to install the required libraries.
pip install -r requirements.txtThe program requires two inputs, the names file and the audio block file. Additionally you can specify the output file name by using -o or –output. For example, the below command would take the name file “names.txt”, the audio block “audio.bin” and produce the file “drums.tzx”.
tzx-builder names.txt audio.bin -o drums.tzx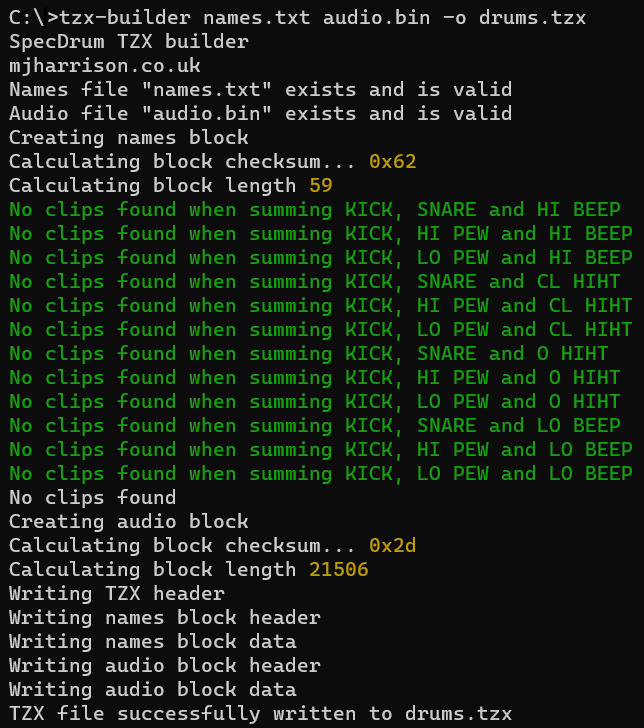
Downloads:
SpecDrum Toybox (TZX)
SpecDrum Toybox (raw TZX blocks as templates to work from)
tzx-builder executable
Leave a Reply